

TL;DR: What is a Blind Spot Mirror
To install blind spot mirrors correctly, clean the side mirror thoroughly, choose the correct placement angle, remove the adhesive backing, and press the convex mirror firmly for 30–60 seconds. Proper placement improves lane visibility, parking awareness, and overall driving safety while reducing blind zones effectively.
Installing blind spot mirrors properly requires careful placement, a clean mounting surface, and correct viewing angle adjustment to maximize visibility and reduce blind zones. Most blind spot mirrors use automotive adhesive backing and can be installed within minutes. Correct positioning dramatically improves lane-changing safety, parking visibility, and driver confidence during everyday driving conditions.
Installing blind spot mirrors takes less than 10 minutes, but placement matters more than most people realize. Clean the mirror surface properly, test the viewing angle before sticking them permanently, and avoid placing them where they block your main mirror visibility. In my experience as an automotive diagnostic technician I have seen how people are making silly errors while installing them which ended up in costly mechanic bills.
Table of Contents
Tools You Need to Install Blind Spot Mirror
You really don’t need much:
- Microfiber cloth
- Glass cleaner or isopropyl alcohol
- Blind spot mirrors
- Dry cloth
That’s it.
No fancy tools.
No complicated wiring.
No dealership visit.
Don’t forget to check blind spot mirror buying guide here
How to Install Blind Spot Mirrors
Step 1: Clean the Side Mirror Properly
This step matters more than people think. If dust, wax, or grease remains on the mirror surface, the adhesive can fail within weeks. Avoid household cleaners that leave residue. I usually recommend:
- Isopropyl alcohol
- Lint-free microfiber cloth
A customer once complained that his new blind spot mirrors “weren’t sticking.” Turns out he installed them immediately after using dashboard protectant spray nearby, which left oily residue on the glass.
We cleaned the mirror properly and reinstalled them problem solved. Yeah, tiny details make a huge difference sometimes.
Step 2: Test Placement Before Removing Adhesive
This is where most installation mistakes happen. Before peeling the adhesive:
- Sit in your normal driving position
- Hold the mirror temporarily
- Check visibility angles
You want to see:
- Adjacent lane coverage
- Rear wheel visibility
- Blind zone reduction
without blocking your main mirror view. Best Placement for Blind Spot Mirrors are;
Upper Outer Corner: Best for highway driving and lane changes
Lower Outer Corner: Best for parking, curbs and tight spaces
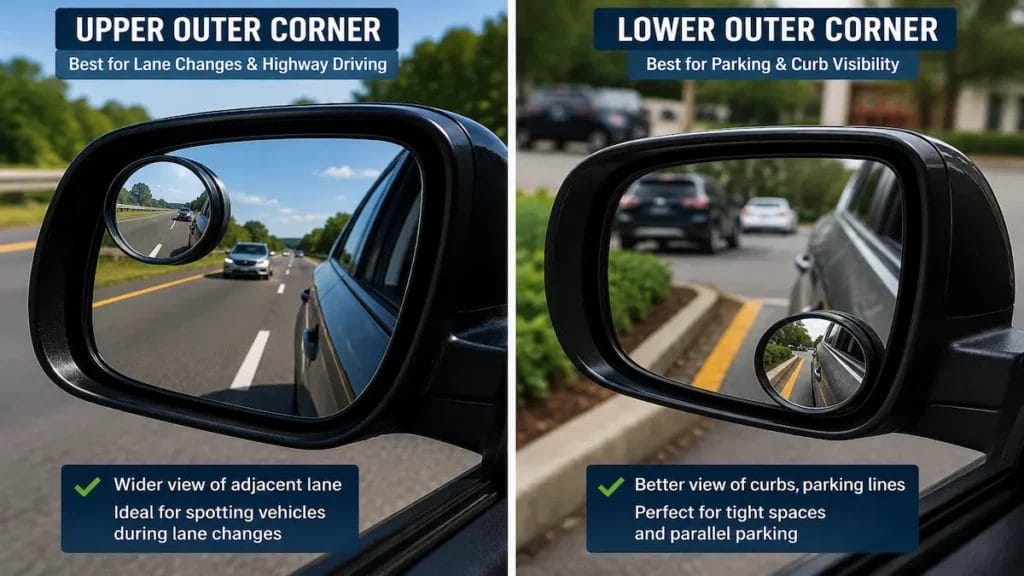
Over the years, I’ve noticed truck drivers usually prefer lower corner placement because it helps them monitor trailer wheels and parking lines better. Meanwhile, daily commuters often prefer upper placement for smoother freeway lane changes. Honestly, there isn’t one “perfect” position for everybody. Driver habits matter too.
Step 3: Remove Adhesive Backing Carefully
Peel the adhesive slowly. Avoid touching the sticky surface with your fingers because oil contamination weakens bonding strength.
If the mirror uses 3M automotive tape, you’re usually getting decent long-term durability. Cheap adhesive? That’s where problems start.
Step 4: Press Firmly for 30–60 Seconds
Apply firm pressure evenly. This helps:
- Eliminate air gaps
- Improve adhesion
- Prevent moisture entry
Try not to reposition the mirror after sticking it down. Once the adhesive bonds, moving it can weaken the tape.
Step 5: Wait Before Washing the Vehicle
This gets ignored constantly. I recommend waiting:
- 24 hours before washing
- 48 hours before pressure washing
Heat and moisture can weaken fresh adhesive. Especially during hot Australian summers.
Check here for mirror adjustment safety: https://www.nhtsa.gov/road-safety/blind-zones-and-mirrors?
Common Blind Spot Mirror Installation Mistakes
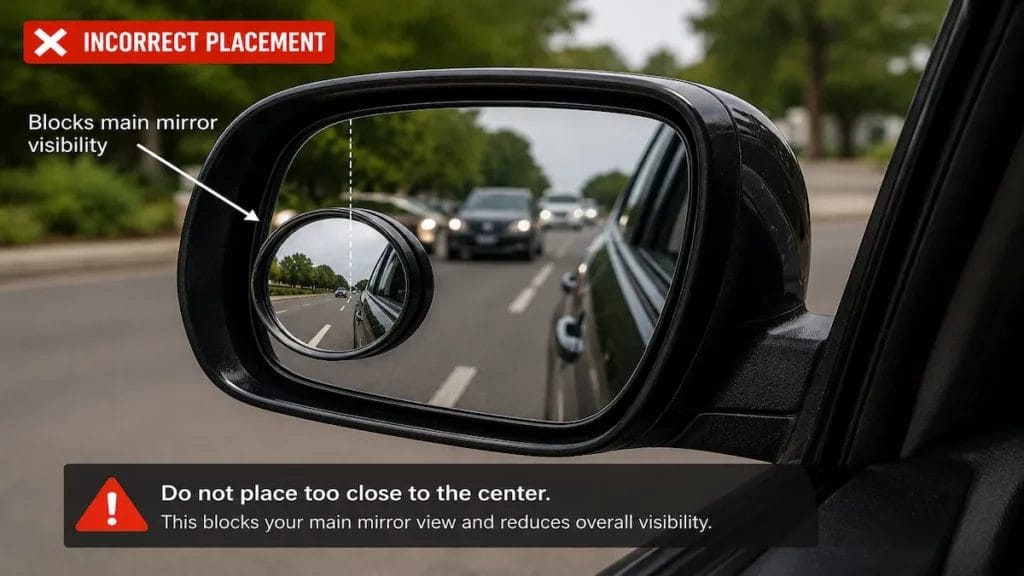
Installing Too Close to the Center
This blocks normal mirror visibility. Blind spot mirrors should expand visibility not replace your factory mirror.
Skipping Cleaning Preparation
Dust and oils ruin adhesive strength. Simple as that.
Choosing the Wrong Mirror Size
Oversized mirrors often distort visibility and create unnecessary distraction.
How to Adjust Blind Spot Mirrors After Installation
Once installed:
- Sit normally in the driver seat
- Check neighboring lane visibility
- Verify parking line visibility
- Adjust if your mirror type allows movement
The goal is smooth visual transition between:
- Main mirror
- Blind spot mirror
- Peripheral vision
Are Adjustable Blind Spot Mirrors Better?
In many cases, yes. Especially for:
- Trucks
- SUVs
- Towing setups
But fixed mirrors usually last longer because fewer moving parts can loosen over time.
When Should You Replace Blind Spot Mirrors?
Replace them if you notice:
- Fogging
- Cracks
- Loose adhesive
- Distorted reflections
Most quality blind spot mirrors last several years. Cheap ones? Sometimes only months.
Real-World Driving Benefits
After installing blind spot mirrors for customers over the years, I’ve consistently heard the same feedback: “I should’ve done this earlier.”
Drivers usually notice improvements during:
- Highway merges
- Parking
- Reverse maneuvering
- Heavy traffic driving
Sometimes it’s the small upgrades that make driving feel less stressful.
Final Thoughts
Learning how to install blind spot mirrors correctly can significantly improve daily driving visibility and confidence. Proper cleaning, careful placement, and strong adhesive bonding are essential for long-term durability and effective blind zone reduction. After more than 10 years in automotive diagnostics, I still recommend install blind spot mirrors properly because they remain one of the easiest and most affordable vehicle safety upgrades available.
Frequently Asked Questions
Can blind spot mirrors be removed easily?
Yes, most can be removed carefully using heat and adhesive remover without damaging the original mirror.
Do blind spot mirrors work at night?
Yes, high-quality convex mirrors maintain good visibility during nighttime driving.
How long do blind spot mirrors last?
Quality blind spot mirrors typically last several years with proper installation.
Can I install blind spot mirrors myself?
Absolutely. Most drivers can install blind spot mirrors in under 10 minutes.
What size blind spot mirror should I buy?
Smaller vehicles usually need compact mirrors, while SUVs and trucks benefit from larger rectangular designs.