
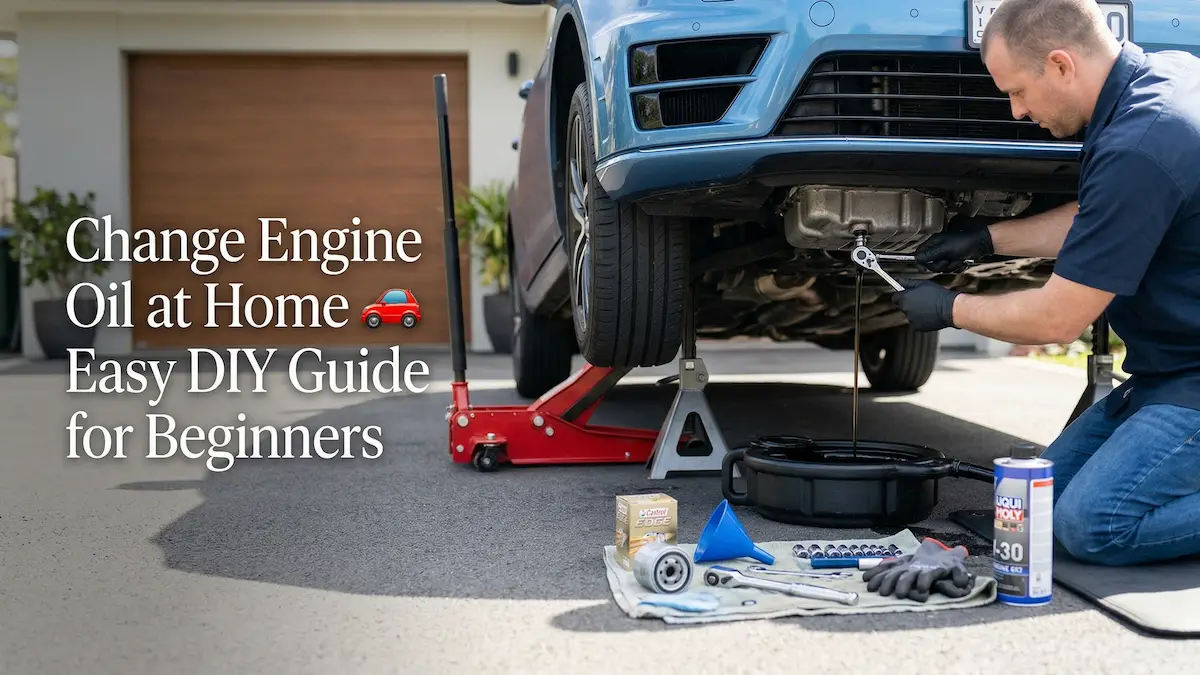
TL;DR: How Do You Change Engine Oil at Home?
To change engine oil at home, warm the engine slightly, safely raise the vehicle, drain the old oil, replace the oil filter, reinstall the drain plug, refill the engine with the manufacturer-recommended oil, check the oil level, and inspect for leaks. Most DIY oil changes take 30 to 60 minutes and can help extend engine life when performed at the correct service intervals.
There is a reason engine oil is often called the lifeblood of a vehicle. Over the years, I’ve worked on cars with immaculate service histories and others that had been neglected for far too long. One pattern has always stood out. Vehicles that receive regular oil changes generally stay healthier, run smoother, and avoid many of the expensive engine repairs that plague poorly maintained cars.
I still remember a customer bringing in a high-mileage family sedan that had travelled well beyond 250,000 kilometres. The engine wasn’t perfect, but it was remarkably clean internally. When I asked about its maintenance history, the owner proudly showed a folder containing years of oil change records. That engine had survived largely because someone understood the importance of clean oil.
The good news is that changing engine oil isn’t a task reserved for professional workshops. With the right tools, a little patience, and proper safety precautions, most vehicle owners can successfully change engine oil at home.
Learning how to change engine oil at home can save money, help you understand your vehicle better, and give you confidence when tackling basic maintenance. More importantly, it can help extend the life of one of the most expensive components in your vehicle: the engine itself.
In this guide, you’ll learn exactly how to perform a DIY oil change, choose the correct oil, avoid common mistakes, and understand why this simple maintenance task remains one of the most valuable investments you can make in your vehicle.
What’s Inside? (Quick Glance)
Why Regular Oil Changes Matter More Than Many Drivers Realise
Many people assume engine oil only lubricates moving parts. While lubrication is certainly important, modern engine oil performs several critical functions simultaneously.
As oil circulates through the engine, it creates a protective film between metal surfaces, reducing friction and minimising wear. It also helps transfer heat away from internal components, preventing excessive temperatures that can damage engine parts over time.
Modern oils contain additives that fight corrosion, prevent sludge formation, and keep contaminants suspended until they can be captured by the oil filter. Without these additives, engines would wear out much faster.
In workshop vehicles I’ve serviced over the years, neglected oil changes were often linked to timing chain wear, sludge accumulation, blocked oil passages, and increased engine noise. Conversely, engines that received regular servicing generally remained cleaner internally and delivered more consistent performance even at high mileage.
This is why changing engine oil at home isn’t simply about saving money. It’s about protecting your investment and avoiding problems that can cost thousands to repair later.
When Should You Change Engine Oil?
One of the most common questions vehicle owners ask is how often they should change their oil. The answer depends on several factors, including the vehicle, oil type, driving conditions, and manufacturer recommendations.
Years ago, the widely accepted rule was every 5,000 kilometres. Modern engines and synthetic oils have dramatically extended those intervals. Many manufacturers now recommend oil changes between 10,000 and 15,000 kilometres under normal driving conditions.
However, “normal driving conditions” often don’t reflect real life. If you regularly sit in heavy traffic, tow trailers, carry heavy loads, drive in extreme temperatures, or make frequent short trips, your oil may deteriorate faster than expected.
Short journeys are particularly tough on engine oil because the engine may never fully reach operating temperature. This allows moisture and contaminants to accumulate inside the crankcase.
Whenever customers asked me for the safest approach, I always recommended following the owner’s manual first. Manufacturers invest significant resources testing lubrication requirements for specific engines, making their recommendations more reliable than generic maintenance advice.
Signs Your Engine Oil Needs Changing
Mileage intervals are important, but there are also physical signs that can indicate your oil is reaching the end of its useful life.
One of the most obvious signs is the appearance of an oil maintenance reminder on the dashboard. Modern vehicles often use sophisticated monitoring systems that calculate oil life based on driving conditions rather than simple mileage.
You may also notice increased engine noise, rougher operation, or reduced fuel economy. In some cases, drivers describe the vehicle as feeling less smooth or responsive than usual.
While dark oil alone isn’t necessarily a problem, excessively thick, dirty, or sludgy oil should never be ignored.
When inspecting used oil during workshop services, I often found that the condition of the oil told a surprisingly detailed story about how the vehicle had been maintained. Clean oil generally reflected consistent servicing, while severely contaminated oil often revealed neglected maintenance schedules.
Choosing the Correct Engine Oil
Selecting the correct oil is one of the most important parts of the entire process. Before purchasing oil, check your owner’s manual for the required specification. This information may also be printed on the oil filler cap or available through manufacturer service documentation.
Most drivers are familiar with viscosity ratings such as 5W-30, 0W-20, or 10W-40, but many modern engines also require oils that meet specific manufacturer approvals. If you’re unsure how viscosity ratings work, the technical resources available from Shell’s motor oil guide can help explain how oil grades affect engine protection and performance.
Using the wrong oil doesn’t necessarily cause immediate damage, but it can affect cold-start protection, fuel economy, emissions system performance, and long-term durability.
If you’re unsure about oil specifications, educational resources from Shell and Mobil provide useful explanations of viscosity grades and manufacturer approvals. Understanding these ratings can help you make informed decisions when purchasing oil.
Synthetic vs Conventional Oil
Another question that frequently appears among DIY mechanics is whether synthetic oil is worth the extra cost. In my experience, synthetic oil is often the better choice for modern vehicles.
Synthetic oils typically provide improved protection during cold starts, better resistance to heat breakdown, and longer service intervals. These advantages are particularly beneficial for turbocharged engines, which operate under higher temperatures and stress.
Conventional oil may still be suitable for some older vehicles, but most modern engines benefit from synthetic formulations. Many manufacturers now specify synthetic oil as standard equipment.
Although synthetic oil usually costs more initially, the extended service intervals and improved protection often make it a worthwhile investment. The educational materials available through Mobil’s oil education centre provide useful insights into the differences between synthetic and conventional motor oils.
Best Tools for Changing Engine Oil
Preparation is one of the biggest factors separating a smooth DIY oil change from a frustrating one.
Before beginning, gather all required tools and supplies. This includes the correct engine oil, a replacement oil filter, a drain pan, a funnel, a socket set, gloves, and either vehicle ramps or jack stands.
One habit I’ve developed over the years is performing a quick vehicle inspection whenever I change oil. While you’re already working around the vehicle, it’s an ideal opportunity to check tyre pressures, inspect fluid levels, and look for signs of leaks or wear.
This is also a good time to connect a diagnostic scanner. In fact, one of the tools featured in our Best OBD2 Scanners guide can help identify stored fault codes and reset maintenance reminders after servicing.
Having everything prepared before you start makes the entire process faster, cleaner, and far less stressful.
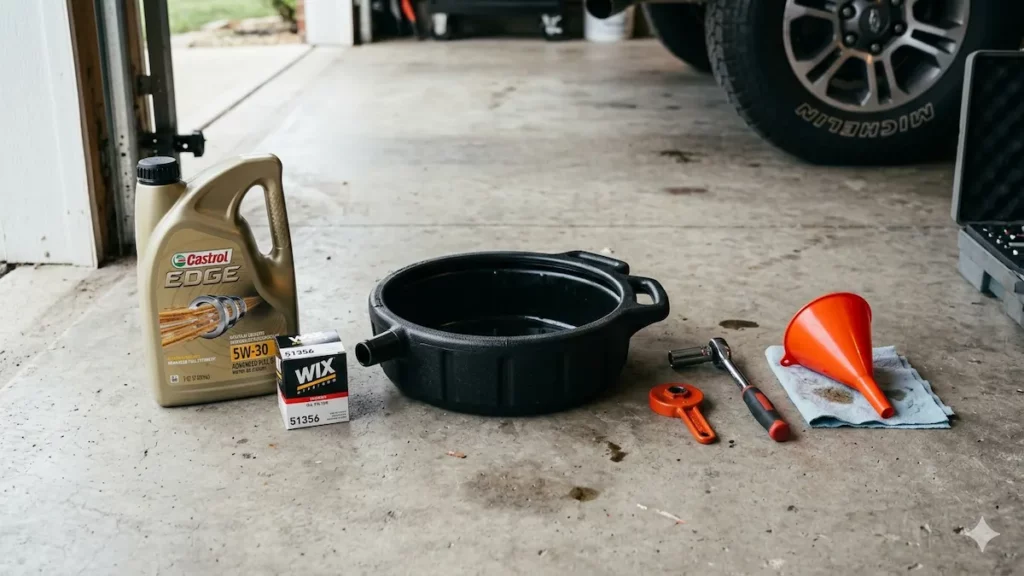
Before Starting gather these essentials;
- Engine oil (check your car manual for the correct type)
- Oil filter (specific to your vehicle)
- Oil filter wrench
- Socket wrench set
- Oil drain pan
- Funnel
- Car jack & jack stands (or ramps)
- Gloves & safety glasses
- Old cloth or paper towels
Step by Step Oil Change Guide
Step 1: Preparing the Vehicle Safely
Safety should always be your first priority. Park the vehicle on level ground and engage the parking brake. If you’re using ramps, ensure they are properly positioned and that the vehicle is securely supported before proceeding.
If you’re lifting the vehicle with a jack, always use appropriately rated jack stands.This is a rule that should never be compromised. Throughout my years in workshops, proper vehicle support was considered non-negotiable because even a simple maintenance task can become dangerous if safety procedures are ignored.
Once the vehicle is secure, open the bonnet and remove the oil filler cap. This allows air to enter the system during draining and helps the old oil flow more efficiently.
Step 2: Warm the Engine Slightly
A common misconception is that oil should be drained from a completely cold engine. In reality, slightly warm oil flows more freely and removes contaminants more effectively.
Start the engine and allow it to idle for approximately three to five minutes. The goal is to warm the oil, not bring the engine fully up to operating temperature. Hot oil can cause burns, so avoid performing an oil change immediately after a long drive.
Allowing the oil to reach a mild temperature provides the ideal balance between safety and efficient drainage.
Step 3: Locate the Oil Drain Plug
Position the drain pan beneath the oil pan and identify the drain plug. This step may seem obvious, but it deserves careful attention.
One mistake occasionally encountered in workshops involves accidentally removing the transmission drain plug instead of the engine oil drain plug. While experienced technicians rarely make this error, beginners can sometimes confuse the two.
If you’re uncertain, consult a repair manual or manufacturer documentation before loosening any plugs. A few minutes spent verifying the correct component can prevent a costly mistake.
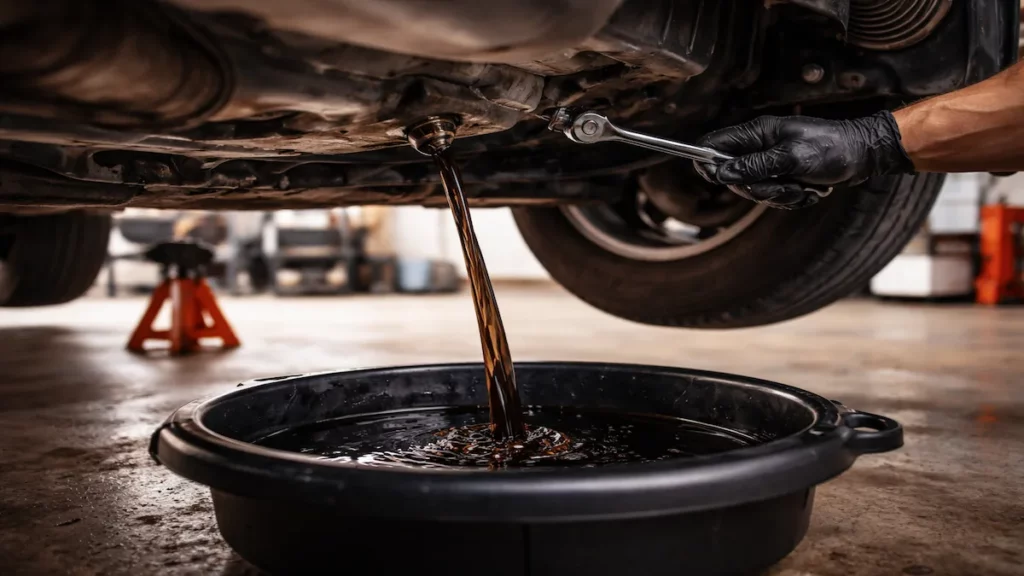
Step 4: Drain the Old Oil
Carefully loosen the drain plug and allow the old oil to flow into the drain pan. This stage often requires patience. Resist the temptation to rush. As the oil drains, take a moment to observe its condition. Used oil can provide valuable clues about engine health.
Small amounts of fine metallic residue may be normal in some high-mileage engines, but excessive metal particles, coolant contamination, or unusual sludge deposits deserve further investigation.
Allow the oil to drain completely before moving to the next step. Leaving significant amounts of old oil behind reduces the effectiveness of the service and dilutes the benefits of the fresh oil you’re about to add.
Step 5: Remove and Replace the Oil Filter
While the oil continues draining, locate the oil filter. Depending on the vehicle, the filter may be accessible from above or below. Some filters can be removed by hand, while others require an oil filter wrench.
Before installing the new filter, compare it with the old one to ensure the size and specifications match. Apply a thin film of fresh oil to the new gasket before installation. This simple step helps create a proper seal and makes future removal easier.
Hand-tightening is generally sufficient. Over-tightening often causes more problems than it prevents. At this stage, the most important part of the oil change is nearly complete.
Step 6: Reinstall the Drain Plug
Once the old oil has completely drained, clean the drain plug and inspect its condition before reinstalling it.
Many vehicles use a crush washer or sealing washer that helps prevent leaks. These washers are inexpensive, yet they’re often overlooked by DIY mechanics. In workshop servicing, replacing the washer during each oil change was considered standard practice because it reduces the chance of developing small leaks later.
Thread the drain plug in by hand first to avoid cross-threading. Once it is seated correctly, tighten it according to the manufacturer’s specification.
One of the most expensive oil change mistakes I’ve seen involved a stripped oil pan thread. A simple service turned into a repair that cost several hundred pounds because the drain plug was overtightened.
Step 7: Add Fresh Engine Oil
With the drain plug secure and the new filter installed, it’s time to add fresh oil. Using a funnel helps prevent spills and keeps the engine bay clean.
I generally recommend adding slightly less than the full capacity initially. Different engines retain varying amounts of residual oil after draining, and it’s always easier to add a little more than remove excess oil. Pour the oil slowly and allow it time to settle.
If you’re unsure about oil specifications, both Shell and Mobil provide useful technical resources explaining manufacturer approvals and viscosity ratings. Understanding these requirements can help ensure you’re using the correct lubricant for your specific engine. Once the oil has been added, reinstall the filler cap securely.
Step 8: Verify the Oil Level
Allow several minutes for the fresh oil to settle inside the engine before checking the dipstick. Remove the dipstick, wipe it clean, insert it fully, and then check the reading. The oil level should sit comfortably between the minimum and maximum marks.
This stage often surprises first-time DIY mechanics because the level can change slightly after the engine has been started and the new filter fills with oil.
Taking your time here prevents overfilling, which is one of the most common mistakes made during an oil change.
Step 9: Start the Engine and Inspect for Leaks
Start the engine and allow it to idle for several minutes. The oil pressure warning light should disappear quickly. If it remains illuminated, switch the engine off immediately and investigate the cause.
While the engine runs, inspect both the oil filter and drain plug area carefully. Even a small leak can create problems if ignored.
Once the inspection is complete, switch the engine off, wait a few minutes, and perform one final oil level check. This final verification step confirms that everything has been completed correctly.
Common Oil Change Mistakes
One reason I encourage vehicle owners to learn how to change engine oil at home is that it helps them better understand their vehicles. However, there are several mistakes that appear repeatedly among beginners.
The most common is overfilling the engine. Many people assume extra oil provides additional protection. In reality, excessive oil can create foaming, increase crankcase pressure, and potentially damage seals.
Another frequent issue involves forgetting to remove the old oil filter gasket. Installing a new filter on top of an old gasket can result in a significant leak shortly after startup.
I’ve also seen people reuse damaged drain plug washers repeatedly. Considering how inexpensive these washers are, replacing them during each service is usually the smarter option.
Finally, improper vehicle support remains one of the most serious mistakes. Never work underneath a vehicle supported only by a jack.
DIY Oil Change vs Professional Workshop Service
A common question among vehicle owners is whether performing an oil change at home is genuinely worth the effort. The answer depends on your priorities.
If your primary goal is saving money, DIY maintenance can be attractive. Labour charges are removed from the equation, and you have complete control over the products used.
On the other hand, professional workshops provide convenience and often include vehicle inspections that may identify developing problems.
In my experience, many enthusiasts enjoy the satisfaction of maintaining their own vehicles, while others prefer the simplicity of professional servicing. Neither approach is inherently right or wrong. The important thing is ensuring the oil is changed correctly and on schedule.
Love to cut more maintenance costs? For more DIY tips, explore our complete car maintenance guides to keep your vehicle in top condition.
The Hidden Benefits of DIY Maintenance
The biggest advantage of learning how to change engine oil at home isn’t necessarily the money saved. It’s the familiarity you develop with your vehicle.
When you’re underneath the car inspecting components regularly, you notice things that might otherwise go unnoticed. Small leaks, worn suspension components, cracked belts, and tyre wear patterns often reveal themselves during routine maintenance.
Whenever I perform an oil change, I also check tyre pressures and inspect the condition of the battery. Having one of the portable units featured in our guide to the best portable air compressors makes this process quick and convenient.
Similarly, if a vehicle has been sitting for an extended period before maintenance, one of the options from our best car jump starters guide can save considerable time and frustration. These additional inspections often provide just as much value as the oil change itself.
How to Dispose of Used Engine Oil Responsibly
Used engine oil should never be poured into drains, onto soil, or into household rubbish. Even small quantities can contaminate large amounts of water and cause environmental harm.
Most recycling centres accept used motor oil, and many automotive workshops also participate in recycling programmes. I recommend transferring the used oil into sealed containers immediately after draining and storing it safely until it can be delivered to an approved recycling facility.
Responsible disposal is an important part of vehicle ownership and helps protect local ecosystems.
Buyer’s Guide: Essential Tools for Future Oil Changes
If you plan to perform regular maintenance, investing in quality tools can make future oil changes significantly easier. Vehicle ramps are often the simplest option for beginners because they provide stable access underneath the vehicle without requiring extensive lifting equipment.
A durable drain pan reduces mess and makes used oil collection easier. A quality oil filter wrench can save considerable frustration when dealing with stubborn filters.
Diagnostic tools are also becoming increasingly valuable. Modern vehicles rely heavily on electronic systems, and having access to a reliable scanner can help identify maintenance issues before they become expensive repairs.
While researching maintenance equipment, it’s worth reviewing our guide to the best OBD2 scanners for options that suit both beginners and experienced DIY mechanics. Quality tools often pay for themselves after only a few services.
If you’re beginning to build a home maintenance toolkit, an oil change is often just the start.
Learning basic vehicle maintenance can save money, improve reliability, and give you greater confidence behind the wheel. Alongside regular oil changes, investing in a quality diagnostic scanner, portable air compressor, and emergency jump starter can help you handle many common vehicle issues without immediately visiting a workshop.
The more familiar you become with your vehicle, the easier it becomes to identify potential problems before they develop into major repairs.
Final Thoughts
Learning how to change engine oil at home remains one of the most valuable maintenance skills a vehicle owner can develop.
The process is straightforward, the required tools are relatively simple, and the long-term benefits for engine health are substantial.
Throughout my years working on vehicles, I’ve repeatedly seen the difference that consistent oil maintenance makes. Engines that receive clean oil at the correct intervals generally remain more reliable, operate more smoothly, and avoid many of the costly failures associated with neglected servicing.
Whether you’re performing your first oil change or simply refining your maintenance routine, taking the time to do the job properly is one of the best investments you can make in your vehicle’s future reliability.
Frequently Asked Questions
Can I change engine oil without replacing the filter?
Technically yes, but it is rarely recommended. The filter traps contaminants that would otherwise continue circulatin
How long does a DIY oil change take?
Most first-time DIY mechanics can complete the job in approximately 45 to 60 minutes. With experience, the process often becomes significantly faster.
Is synthetic oil worth the additional cost?
For most modern vehicles, yes. Synthetic oils generally provide better protection, improved temperature stability, and longer service intervals.
What happens if I overfill engine oil?
Overfilling can create excessive crankcase pressure, increase oil consumption, and potentially damage seals or emissions components.
How often should I check my oil level?
Checking the oil level every few weeks and before long journeys is a sensible habit.
When I was young and had to service my first car myself I also remember making the mistake of not lining up the bowl to catch the oil properly and I had to clean my Dad’s entire driveway. I also made the mistake of overfilling my oil the first time round as I was in a rush and it made such a mess of my engine.
Learning to do these simple tasks yourself saves a lot of money and these types of fixes are easy to do oneself, even as a woman. It’s well worth trying instead of taking to an expensive mechanic. All you need to do is follow instructions on websites like this one.
Hi Michel,
Thank you very much for your feedback. You are absolutely right and I know this is completely possible for everyone with right guidance. I am happy to educate the society with DIY car maintenance tips as an automotive diagnostic technician.